A video that shows this exercise done in Eclipse is at the bottom of this page.
Some people tell me my YouTube videos are much more enjoyable when run at 2x speed and muted. YMMV.
Git Flow and Maven Tutorial
You are the team lead on an important project, and your developers have all told you their feature branches are complete. But they’ve all gone home for the weekend, and you want to build a release.
The developers have left you with their feature branches. You must merge those feature branches into the develop branch and make sure the merged code compiles. You also need to make sure all of the unit tests pass. If the code compiles and the tests all pass, create a release branch, perform any last minute fixes, and merge that branch into main.
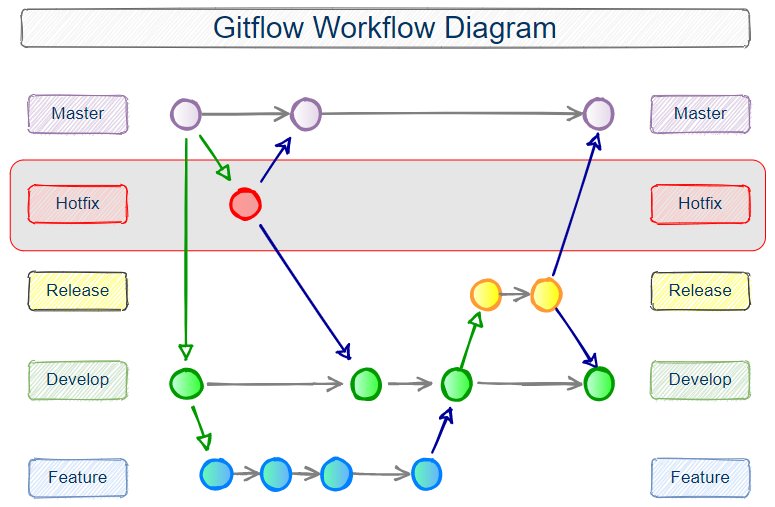
Here’s what the flow will look like:

Commands Used in this Example
The process of merging branches, building the app, running tests, creating a release branch and then testing your application before it merges into main will require the following commands:
### TERMINAL COMMANDS

ls
cd

### Git Commands

git clone https://github.com/cameronmcnz/macro-maven

git config --global user.name "Cameron"
git config --global user.email "me@example.com"

git add .
git commit -m "commit message"

git branch -a
git push origin

git checkout -branchname-
git merge --no-ff -branchname-
git tag 1.0

git branch -d release

git log --all --decorate --oneline --graph

### Apache Maven Commands (These are new. Don't fret.)

mvn clean
mvn compile
mvn test
mvn clean install tomcat7:exec-war-only
mvn compile checkstyle:checkstyle findbugs:findbugs pmd:pmd

### Java Commands

java -jar executable.jar

### Git Lifesaver Commands

:q
Note that any time you need to escape back to the command prompt in BASH, just type :q
0. Play on Expert Level
The following steps have you clone a repository that you have no rights to. If you want to play this game on expert level, fork the https://github.com/cameronmcnz/macro-maven repository first. Then clone your own forked version of the repository. If you do, then you own your fork and have all rights to push and pull to and from it.
1. Clone the Remote Repository
Create a folder named C:\workspace and open this folder up in the BASH shell. This can be done by right-clicking on the folder in Windows Explorer and selecting Git Bash Here. You might already have one created. You can run this from any folder on your filesystem if you like, so long as you have Git installed.
Issue the following command to clone the repository:
git clone https://github.com/cameronmcnz/macro-maven
A new folder will appear in C:\workspace named learn-devops. This folder will contain another folder named numberguesser. Open the C:\workstation\learn-devops\numberguesser folder in Windows Explorer and note the existence of a POM file. This file indicates that the numberguesser is a Maven based project.
Right click on the numberguesser folder and select Git Bash Here to open a terminal window in this folder.
Type the ls command into the terminal window to ensure the POM file is in the BASH windows’s directory.
me@computer MINGW64 /c/workspace/learn-devops/numberguesser (main)
$ ls
pom.xml  src/
2. Compile and Test the Application
Issue the following command to make sure all of the Java code compiles:
mvn compile
The command may report some errors, but there should be a green BUILD SUCCESS message indicating that the code compiled successfully.
Run All Software Tests
Make sure all of the tests pass by issuing the following command:
mvn test
3. List All Branches
List all of the local and remote branches.
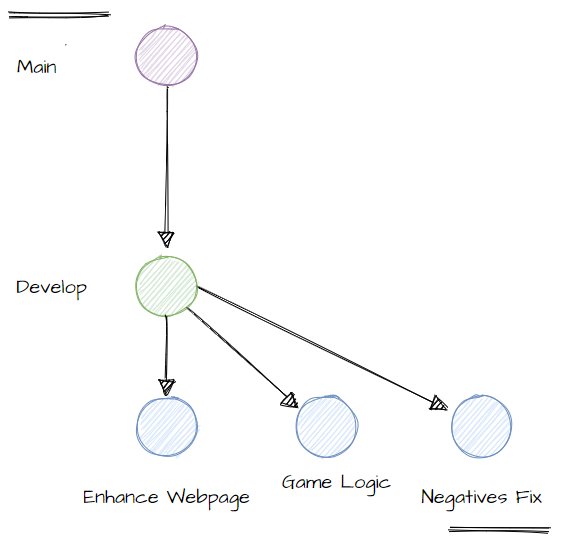
$ git branch -a
* main
  remotes/origin/FEATURE/enhance_webpage
  remotes/origin/FEATURE/game_logic
  remotes/origin/FEATURE/negatives_fix
  remotes/origin/HEAD -> origin/main
  remotes/origin/development
  remotes/origin/main
4. Checkout the First Feature Branch
Check out the remote FEATURE/enhance_webpage branch to make it local.
git checkout FEATURE/enhance_webpage
List the branches to prove the checked out branch has become local:
$ git branch -a
* FEATURE/enhance_webpage
  main
  remotes/origin/FEATURE/enhance_webpage
  remotes/origin/FEATURE/game_logic
  remotes/origin/FEATURE/negatives_fix
  remotes/origin/HEAD -> origin/main
  remotes/origin/development
  remotes/origin/main
In Windows Explorer, open the \numberguesser\src\main\java\com\mcnz\servlet folder.
Note the number of Java files in this folder. We want to merge these files into the development branch.
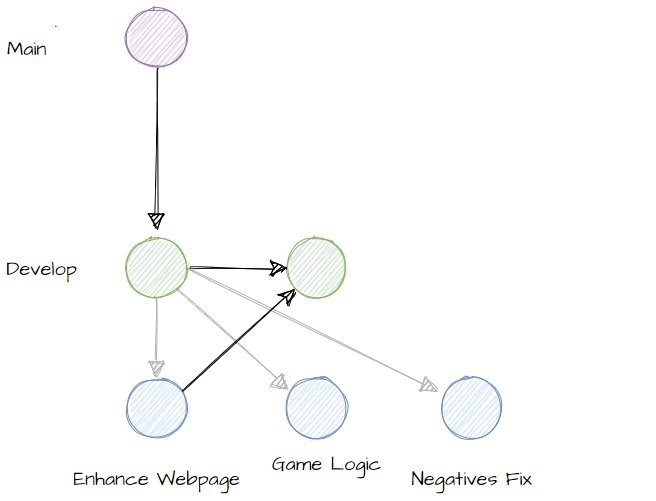
5. Merge Feature into Development
To merge the feature branch into the development branch, you must be on the development branch.
Checkout the development branch with the following command:
git checkout development
There should now only be one Java file in the \servlet folder, whereas before there were two.
Merge the FEATURE/enhance_webpage branch into development with the following command:
git merge --no-ff FEATURE/enhance_webpage -m "Enhanced webpage merged"
6. Compile and Test the Merge
After the merge compmletes, compile and test the code on the development branch with the following two commands:
mvn compile
mvn test
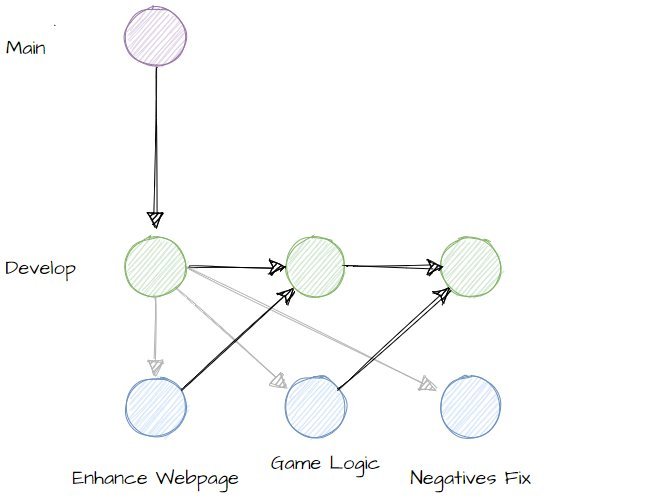
7. Merge the Second Feature Branch
Checkout the FEATURE/game_logic branch:
git checkout FEATURE/game_logic
Count the number of Java files in the \servlet folder monitored earlier. There should be 3 now.
Merge the FEATURE/game_logic branch into the development branch. First checkout the development branch. Then perform the merge.
git checkout development
git merge --no-ff FEATURE/game_logic  -m "Game Logic merged"
Note the number of files in the development branch’s \servlet folder has changed to match the FEATURE/game_logic branch.
Compile the merged code and test it.
mvn compile
mvn test
Now merge the remotes/origin/FEATURE/negatives_fix branch.
A checkout of the FEATURE/negatives_fix branch is required to make the remote branch local.
git checkout FEATURE/negatives_fix
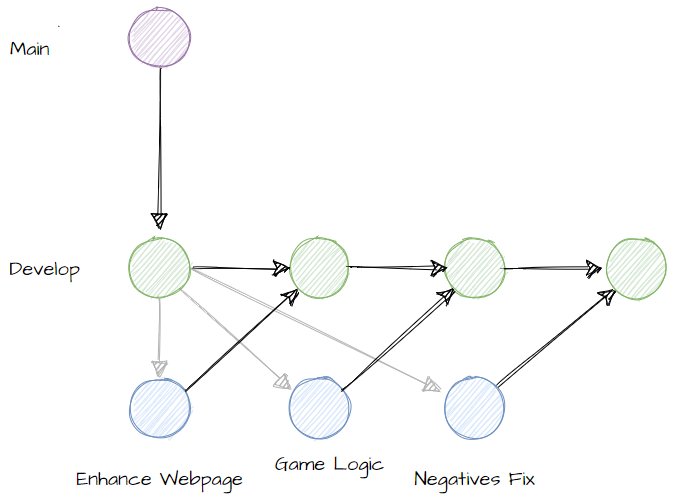
8. Merge the Third Feature Branch
Return to the development branch. Merge, compile and test the code.
The compile and test still will initially fail.
git checkout development
git merge --no-ff FEATURE/negatives_fix  -m "Negatives fix merged"
9. Fix Compilation Errors
There is a compilation error in the merged code, so the compile command will fail:
mvn compile
[ERROR] numberguesser/src/main/java/com/mcnz/servlet/CoreLogic.java:[26,68] ';' expected
The error message says a semi-colon is missing on line 26 of the CoreLogic.java file. Open this file in a text editor and add the missing colon.
Before (no semi-colon)
magicNumber = Math.abs(magicNumber)
After (semi-colon added)
magicNumber = Math.abs(magicNumber);
Save the file and re-run the build. If the build fails, double-check to make sure you properly saved the file after the edit.
mvn compile
The Maven build should run successfully.
Now test the build. This will also fail.
mvn test
 BUILD FAILURE
 There are test failures.
 Failed tests:   testWinLogic(com.mcnz.servlet.NumberGuesserTest)
10. Fix the Failed Test
Open the NumberGuesserTest.java file and fix the error that has caused the testWinLogic code to fail.
The NumberGuesserTest.java file can be found in the following folder:
C:\workspace\learn-devops\numberguesser\src\test\java\com\mcnz\servlet
The class includes a test the will obviously fail. Change the testWinLogic from this:
@Test
public void testWinLogic() {
  Assert.assertTrue(false);
}
to this:
@Test
public void testWinLogic() {
  Assert.assertTrue(true);
}
Save your changes and have Maven rerun the tests. The build will run successfully.
mvn test
Add the changed file to the index and then commit the code.
11. Commit and Create the Release Branch
After the commit is made, create a release branch.
git add .
git commit -m "feature branch merges complete"
git checkout -b release
You should now be on the release branch.
Before you merge to main, build an executable JAR file so you can run your application and perform a few last-minute tests.
mvn clean install tomcat7:exec-war-only
This command will place a file named executable.jar in the \target subfolder of your project.
12. Make Sure Port 8080 is Open
Make sure all programs running on port 8080 are stopped.
Jenkins may be running on port 8080. Got to http://localhost:8080 to check.
If Jenkins is running, open the Windows Services app and shut down the Jenkins service.
Also ensure no other Tomcat servers are running. Stop any test servers running in Eclipse.
13. Run the NumberGuesserGame
Open the BASH shell in the \target folder and issue the ls command.
Make sure the executable.jar file is in the folder.
V@D MINGW64 /c/workspace/learn-devops/numberguesser/target (release)
$ ls
classes/                 maven-archiver/    surefire-reports/
executable.jar          maven-status/      test-classes/
generated-sources/       numberguesser/     war-exec.manifest
generated-test-sources/  numberguesser.war  war-exec.properties
14. Run the JAR:
If port 8080 is open you can run a JAR as follows. Of course, if Jenkins or some other server is running on 8080, the JAR will fail.
java -jar executable.jar
This should change the port to Wayne Gretzky:
java -jar executable.jar --server.port=8099
Here is another syntax:
java -jar -Dserver.port=8099 spring-5.jar
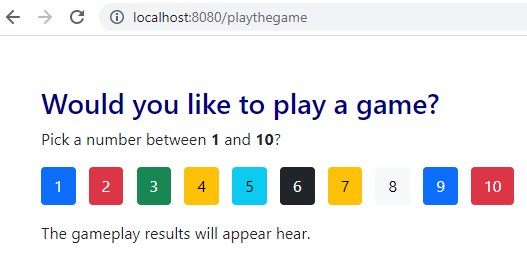
The NumberGuesserGame will then be avaialable at the following URL if you did not change the default port:
http://localhost:8080/playthegame
If you tipped your hat to The Great One, the url will be:
http://localhost:8099/playthegame
Notice the word ‘here’ is incorrectly spelled ‘hear.’ This must be corrected before we merge our release branch into main.
Stop the NumberGuesserGame by pressing CTRL+C in the command prompt used to run the executable.jar file.
15. Fix the Release
Using any test editor, edit the WebpageFactory.java file located in the \servlet folder and change the word ‘hear’ to ‘here.’
Save the file, add it to Git’s index and then commit the changes.
git add .
git commit -m "Release fix made"
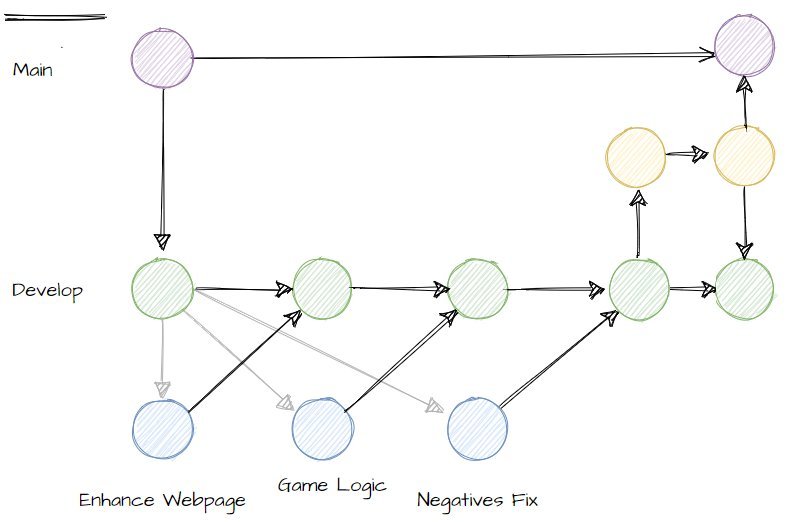
16. Merge with Development
Before you merge,, make sure this change goes into the development branch to ensure it does not get incorporated in a future release.
git checkout development
git merge --no-ff release  -m "Merge release fix to development"
17. Merge into Main
Now merge the release branch into main.
git checkout main
git merge  --no-ff release -m "Merge release to main"
18. Tag the commit.
All commits to main should be tagged with a version number and optional metadata.
git tag 1.0
19. Delete Unnessesary Branches
The only long-term branches in GitFlow are main and development. All other branches can be deleted.
git branch -d FEATURE/enhance_webpage
git branch -d FEATURE/game_logic
git branch -d FEATURE/negatives_fix
git branch -d release
20. Push to Origin
Try to push back to the original server. It will inevitably fail. Why? How would a fork have avoided this?
git push origin
  fatal: Authentication failed
Reference step 0.
21. Log History
Look at your log history with the following command:
git log --all --decorate --oneline --graph
22. Static Code Analyisis
Run FindBugs, PMD (Programmer Mistake Detection) and CheckStyle. These are known as static code analysis tools.
mvn compile checkstyle:checkstyle findbugs:findbugs pmd:pmd
Navigate through the various files these static code analysis tools generate.
Did you push a release onto the main branch without first running a static code analysis check? They’ll bring that up in your annual review.
Conclusion
Congratulations. You have worked with the GitFlow Workflow pattern and successfully built a Java web appliacation with Apache Maven.